
How to Convert HTML to WordPress

The road from sites built with pure HTML to WordPress was not a short one. From an all-text experience, web design has moved on to a highly interactive web presence. In addition to that, we no longer have to write markup ourselves but can let content management systems do the heavy lifting.
However, that doesn’t mean that static HTML websites don’t exist anymore. In fact, HTML5, the latest iteration of the markup language, is very powerful and allows you to build quality websites without a CMS behind them.
Yet, the growing market share of WordPress shows that more and more people are switching to the platform.
For some of them, it means moving from static HTML to WordPress. This can be a daunting task, but this post will attempt to explain how to do it in a few simple ways.
Below, we will show you several ways how to convert from HTML to WordPress. First, you will learn what the different options are as well as their pros and cons. After that, we will show you how to execute each of them step by step.
Let’s get going.
The 3 Ways to Move from Static HTML to WordPress
To move from HTML to WordPress, you need to turn your HTML design into a WordPress theme. A theme controls the look and the feeling of a WordPress website, while the functionality is provided by the CMS itself as well as additional plugins.
To make the switch, you have several options. Which one is the right for you depends on factors like the time and money you are able and willing to invest, your coding skills, and personal preferences. The following are the main options.
A) Manually Convert HTML to a WordPress Theme
The first option is also the most technical. If you go this route, you will take your existing code and use it as a starting point to create the WordPress theme files.
It’s not too complicated, especially if you have coding experience. You can pull it off with a bit of HTML, CSS, and some PHP knowledge. A lot of it is copy and paste.
The downside: while you will end up with a working WordPress theme, it won’t have all of the capabilities WordPress has to offer. For example, unless you build it in after the fact, your site will be without widget areas or the ability to change your menu from the WordPress backend.
While your site will do its job, you won’t be able to manage it completely via WordPress. For that reason, we personally prefer the next option.
B) HTML to WordPress via WordPress Child Theme
In our opinion, this is probably the easiest and most reasonable road in terms of effort and monetary investment. Instead of using your existing site as the jumping-off point, you use a ready-made WordPress theme instead. You then adjust only its design so that it resembles your old website.
Doing so lets you take advantage of WordPress fully while still retaining your old site’s look. You also won’t have to add WordPress features afterward. Instead, you can build on an existing theme – something that the WordPress platform is explicitly made for.
C) Import Content from HTML to WordPress Using Plugin
Obviously, if you don’t insist on using your current design and are open to changing it, things get even easier. In that case, all you need to do is set up a site, install the theme, and import your HTML content. As you will see below, this is a very quick and painless process.
A) How to Manually Convert HTML to a WordPress Theme
If your goal is to start from scratch and create your own WordPress theme that resembles your existing HTML website, start from here.
Don’t worry if it sounds intimidating, you’ll see that it is anything but. Just a few files and folders, as well as some copy and paste, is all it takes.
1. Create a Theme Folder and Basic Files
The first thing you need to do is create a new theme folder. You can do that on your desktop as you would for a directory on your computer. Name it whatever you want your theme to be called.
After that, go to the code editor and create a number of text files. Name them the following:
style.cssindex.phpheader.phpsidebar.phpfooter.php
Don’t do anything with them yet, keep the files open in the editor. You will need them soon.
2. Copy Existing CSS to the WordPress Style Sheet
Now it’s time to prepare the WordPress style sheet (the filestyle.css you just created) to copy your old site’s CSS into it. For that, open the file and paste the following:
This is the so-called style sheet header (Important: don’t leave the comment/*...*/ tags out!). Fill in each part like this:
- Theme Name — Here goes the name of your theme. It can be anything you want but it’s usually the same as the name of your theme folder.
- Theme URI — You would usually post the theme’s homepage here but you may use your own site address.
- Author — That’s you. Put your own name here or whatever you want to be called.
- Author URI — A link to your homepage. It can be the one you are building or whatever makes sense.
- Description — An optional description of your theme. This will show up in the WordPress backend.
- Version — The version of your theme. Since you are not publishing it, it doesn’t really matter. We usually put 1.0 here.
- License, License URI, Tags — These things are only important if you are planning to submit your theme to the WordPress theme directory. You can leave them out in this case, we just included them for the sake of completion.
After the header, copy and paste the existing CSS from your static HTML website. Then, save the file in your new theme folder and close it. Time to move to the rest.
3. Separate Your Existing HTML
For the next part, you need to understand that WordPress usually uses PHP to pull information from its database. For that reason, you need to chop up your existing HTML into different pieces so that the CMS can put them together properly.
While this sounds complicated, all it means is that you copy and paste parts of your HTML document into several PHP files. To demonstrate this better, we have put together a simple example page that you can see below.

As you can see it’s very much a standard HTML template that includes a header, content area, a sidebar, and a footer. The accompanying code is this:
If your design is different, you might have to somewhat adjust the steps below. However, the overall process stays the same.
First, open your current index.html (your HTML site’s main file). After that, go through your newly created WordPress files and copy the following into them (the examples below are my markup):
header.php
Everything from the beginning of your HTML file to the main content area (usually signified with <main> or <div class="main">) goes into this file. In addition to that, right before where it says,</head> copy and paste <?php wp_head();?>. This is crucial for many WordPress plugins to work properly.
sidebar.php
Everything belonging to the section<aside> goes into this WordPress file.
footer.php
Now, all that’s left from the end of the sidebar to the end of the file should be the footer information, which goes here. After that, add a call for <?php wp_footer();?> just before the closing bracket</body> for the same reason as you added wp_head in the header.
After that, you are done with index.html and can close it. Save all other files to your theme folder and close them except for header.php and index.php. You have some more work to do with them.
4. “WordPressify” Header.php and Index.php
For the header, all that’s left is to change the call for the style sheet from HTML to WordPress format. To do so, look for an existing link in the <head> section. It might look something like this:
Replace it with this:
Cool, now you can save and close header.php. Then turn to index.php. It should be empty at the moment. So, first, copy and paste these lines of code:
These are the calls for the other files that contain the rest of your site. You might notice the space between the call for the header and the sidebar. That’s where you will add The Loop.
The latter is the part of WordPress where the CMS outputs content created in the backend. It’s crucial if you want to have WordPress adding content dynamically to your pages which you will import later. To that end, paste this here right after <?php get_header(); ?>:
Now, save index.php file and close it. Well done! Your basic theme is ready. Now you can add it to your new WordPress site.
5. Create a Screenshot and Upload Theme
Now you will add a theme screenshot that, together with the information from your style sheet header, will serve as a preview of your website in the WordPress backend.
To do that, open your existing site in a browser and take a screenshot with your preferred method. After that, open the image editing software of your choice and crop it to 880×660 pixels. Save it as screenshot.png and add it to your theme folder. Now you are ready to upload your theme.
To get the new theme onto your WordPress site, you have several options. However, the prerequisite is that all files reside inside your theme folder.
The first option is to create a zip file out of it. After that, go to your WordPress site and then to Appearance > Themes. Here, click Add New at the top and then Upload Theme.

In the upcoming menu use the button to browse to the location of your zip file. Mark it and click Open, then Install Now. When it’s done, activate the theme.
Alternatively, you can connect to your server via FTP (or just go to the local directory on your hard drive) and navigate to wp-content/themes. Then, upload your (unzipped) theme folder there. After that, activate the theme from the same place as before.
Nice! Your new site’s front end should now look like your old site. All that’s left to complete the move from HTML to WordPress is to import your existing content. We will cover this further below when talking about using an existing WordPress theme.
Be aware, however, that while the basic theme works now, there are more things you can do to integrate your HTML better with WordPress. This includes making your blog title and description editable, adding widget areas, comments, and much more. You might also have to add CSS markup because the content is not part of your original design like images.
As it is a lot of work, we personally like to use a solution that already has all that functionality and only needs a design change. That’s what we will show you next.
B) HTML to WordPress via WordPress Child Theme
If the above seems too intense for you, the next method might be more manageable. It allows you to take advantage of thousands of existing WordPress themes while still retaining your original design.
That’s by using a so-called child theme. These themes are built on top of another theme (the parent) that don’t stand on their own but merely modify the parent theme to fit your needs. Easy enough to do though it takes a bit of detective work.
1. Pick a Suitable Theme
The first step is to pick a suitable theme to base your design on. For that, it helps to find a theme that is close to your existing design or use a theme framework or a starter theme, which both are made to work as a base for custom themes.
Check the WordPress theme directory, our list of awesome themes, or look into premium themes to find a suitable candidate. After some searching, we decided that the Twenty Twelve theme would make a good starting point for my move from HTML to WordPress. Usually, we would pick something more up to date, but it goes well with the simple design we’re working with.
Once you have taken your pick, install the theme on your WordPress website like you would install any theme. No need to activate it. As mentioned, it’s just there to provide a base for you to work with. The rest happens in the child theme.
2. Create a New Folder
Similar to the earlier method, for the child theme, you need to create a theme folder. Here’s where you will put all the files belonging to it.
When creating child themes, it’s common to call the folder the same name as the parent theme plus -child. So, since our child theme is based on the Twenty Twelve theme, we call its directory twentytwelve-child.
Whatever name you choose, just be sure not to include any spaces as it won’t work that way.
3. Set Up the Style Sheet
The child theme also needs a style sheet. This one will work almost the same as the style sheet created above. However, it has a slightly different header and will contain less code.
We will get to the second part later. For now, create the usual style.css and place it in the theme folder. Then, add the following:
As you can see, it’s very similar to the style sheet header you used before with one exception: it contains the Template tag.
In that section, you should put the name of the theme that will function as the parent. Without it, the child theme won’t work. To avoid this, input the folder name of the parent. So, for Twenty Twelve, that would be Template: twentytwelve.
4. Create Functions.php and Inherit Parent Styles
With just the style sheet and the folder, it’s already possible to activate the child theme. However, that wouldn’t do much good since right now your site would look like an HTML page without any styling.
To change that, you first need to inherit the parent’s styles and for that, you need functions.php. This file is an important part of any WordPress installation and allows you to make sweeping changes to your website.
However, in this case, you will only use it to call the parent’s styling. For that, create a new file and call it functions.php. The first thing you will add at the very beginning is this:
With an opening PHP tag, the file is theoretically ready but it doesn’t do anything yet. So, additionally, you will have to input this:
This piece of code tells WordPress to go to the template directory (aka parent theme) and use the styles included there. It also makes it possible to modify the theme via your child theme (more on that later).
5. Activate the Child Theme
At this point, the child theme is ready to be activated.
You can add a screenshot to it as in the instructions above if you want. Aside from that, you can either zip it up and add it to WordPress via Appearance > Themes > Add New > Upload Theme or by simply adding the folder as is to wp-content/themes.
In both cases, when you activate the theme, your site should now look exactly like its parent.
6. Adjust the Design
Here’s where the aforementioned detective work begins. It’s now time to change the design of the existing theme so that it resembles your original HTML site.
For example, one of the first things that stand out is that our WordPress theme adds space above the header and below the footer that our HTML site doesn’t have.

To remedy this, we can look at the HTML site with our browser developer tools to find the markup responsible. When we do so, we encounter this:
Then, we do the same with my new WordPress theme where we find these styles:
My objective is now to apply the styling from the HTML site to the WordPress theme. In this case, we can achieve this simply by adding the following to my child theme’s style.css:
After saving, the WordPress theme has the new styles applied to it:

That’s because anything you add to the child theme’s style sheet overrides the styles in its parent. However, the rest of the markup stays intact, so you are only able to change the things that are relevant.
Plus, if you are using an HTML5 template as a starter and a modern WordPress theme as your parent, a lot of the basic markup will correspond, making your life much easier.
Once you are done adjusting the design, it’s time to import your content. Let’s get to that now.
C) Import Content from HTML to WordPress Using Plugin
Finally, on the list of moving from HTML to WordPress is using an existing theme as is and simply migrating your content from your HTML site into it. This is the simplest way – all you need to do is install and activate the theme of your choice (we assume you know how to do that by now) and then follow the steps below.
By the way, though this process isn’t super hard, there are things that can go wrong. For that reason, make sure you back up your WordPress site before going through with it.
1. Install the Import Plugin
The first thing you need to do is install the plugin HTML Import 2. The easiest way to achieve this is to go to Plugins > Add New and search for it by name. When you find it on the list (it might be further to the bottom), click on Install Now. Activate it when it’s done.

2. Prepare the Import
To import several pages at once, you need to upload them to the same server as your WordPress installation. The plugin will propose something like html-files-to-import the folder name but you can choose whatever you want. Just make sure to remember the pathname.
As you will see in the following, you can also import single pages one by one. For either method, go to WordPress and Settings > HTML Import. We will go over the most basic settings now. If you need additional information or if anything is unclear, refer to the official user guide.
Files
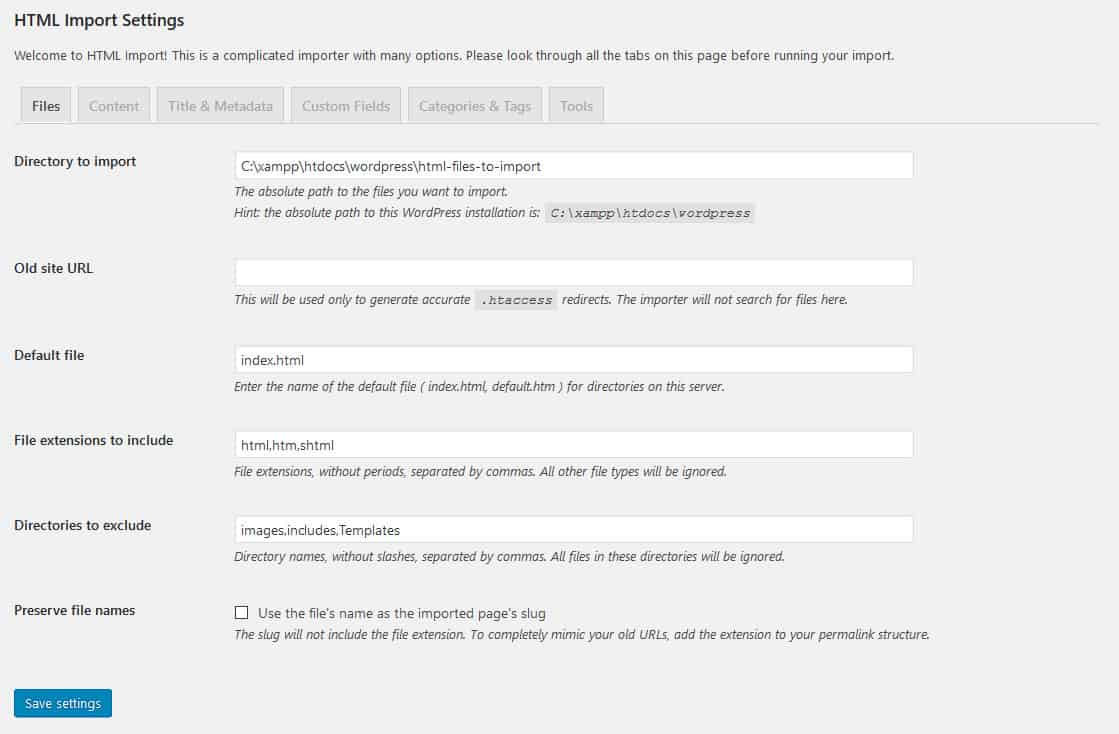
Configure this screen as follows:
- Directory to Import — Enter the path that you just copied your existing files to.
- Old site URL — Used for redirects. Enter your old URL. We will deal with this again later in this article.
- Default file —The default file for directories on the old site, usually
index.html. - File extensions to include — The extensions of files you want to import.
- Directories to exclude — If you have any directories in the old site that you don’t want to import, enter them here.
- Preserve file names — To have the plugin automatically using your file names as the new URL, check this box. This makes sense if your titles are very long because usually, the importer will use them to create the slug.
Content
Under content, you need to configure the HTML tag that contains your site content.
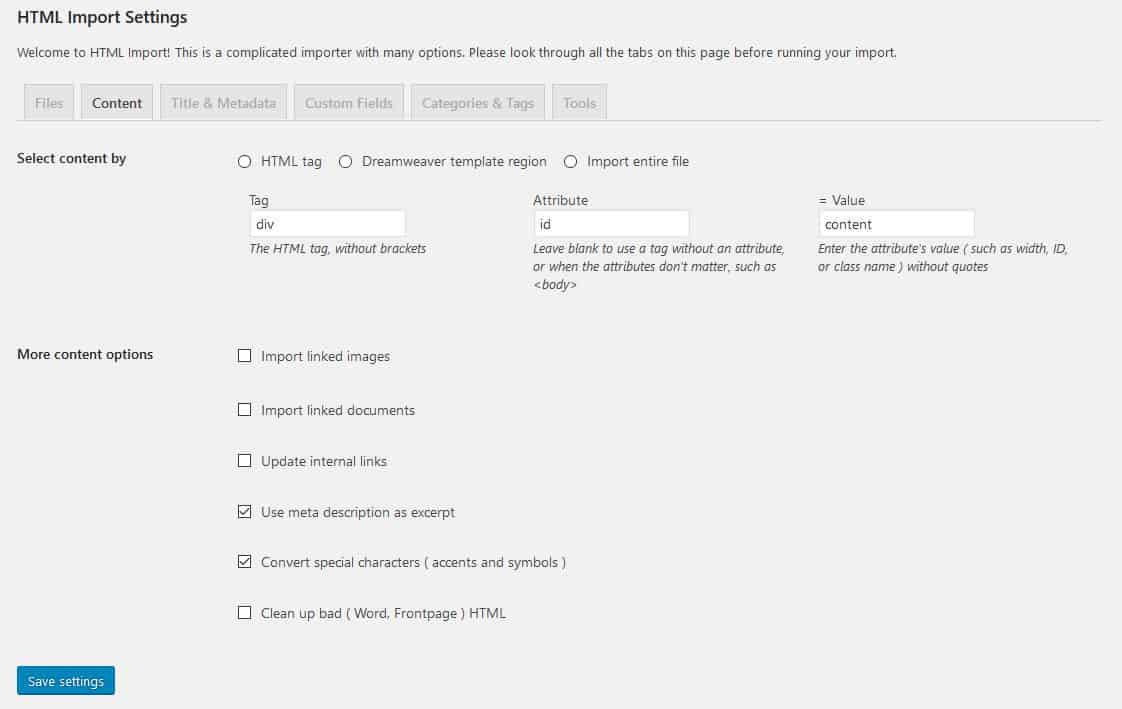
To do that, choose the option HTML tag at the top. Then configure the tag in the following three fields. For example, if your content is contained in a tag called <div id="main">, the information you input would be div, id and main.
The other settings on this page should be self-explanatory and enable you to import images, documents, update internal links, and more.
Title & Metadata
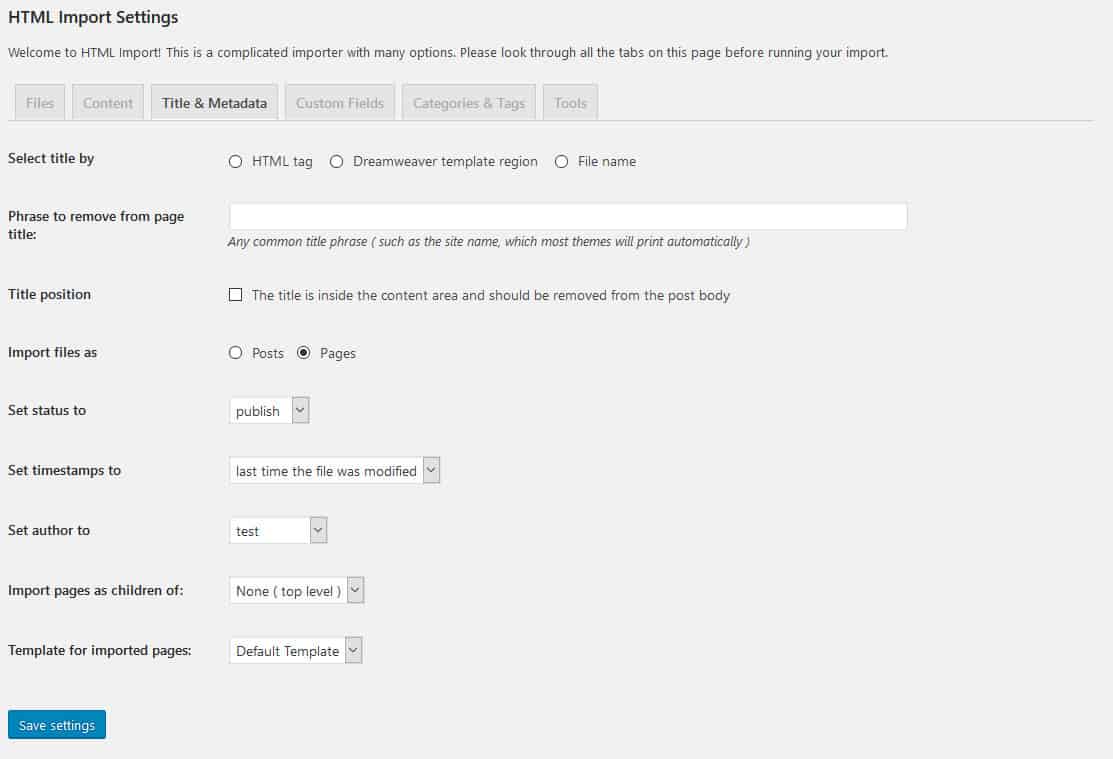
This part is similar to the content part before. However, it’s dealing with page titles. In the beginning, you need to tell the plugin how titles are marked in your HTML template so it can import them into the right place.
In addition, you are able to filter out redundant things like the site title as that’s often displayed by WordPress themes by default. If your titles reside inside the content, you can also tell the importer to delete them so they are not included twice.
What’s important is that you decide whether to import your old content like posts or pages. The rest is rather self-explanatory and lets you configure WordPress settings for new pages.
Custom Fields

If you have any data that needs importing into custom fields, you can configure this here.
Categories & Tags
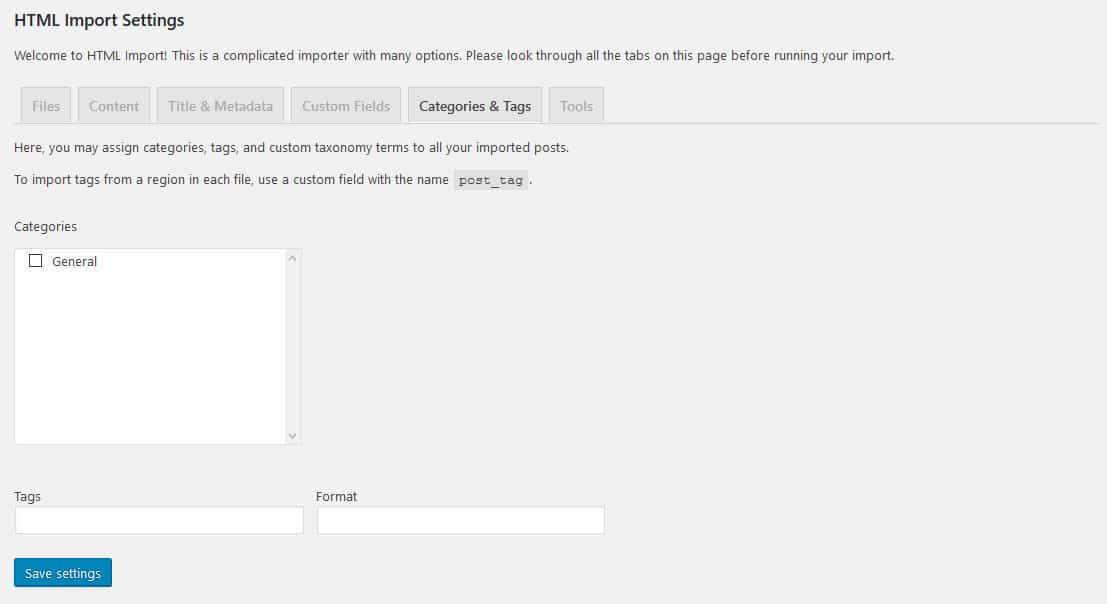
Here you can assign categories, tags, and post formats to your imported content. The plugin will show the existing taxonomy on your site to make this step easier.
Tools
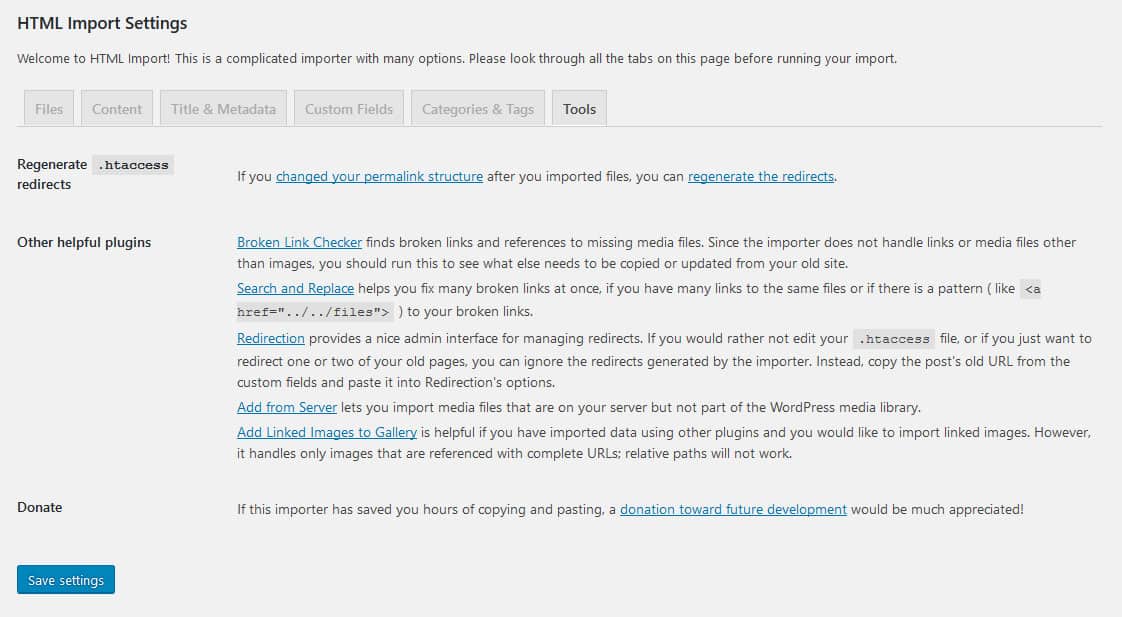
This screen lists a number of useful tools for successfully importing from HTML to WordPress.
3. Start Importing
Once you are done, save the settings. This will enable the Import Files button. Click it to get started.
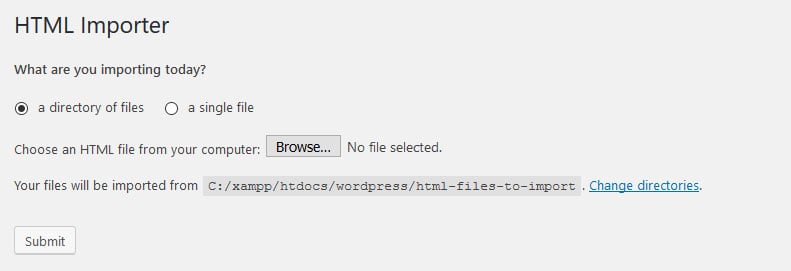
(Note: you can also get here via Tools > Import and then picking Run Importer under the HTML option.)
Next, choose whether to import a directory of files or a single file (you need to browse to it), then hit Submit. The plugin will then go to work.
Once done, you should have all existing content on your WordPress site and formatted by the new theme. Or, if you went one of the other routes, your site should look basically the same as your former HTML website. Nicely done!
Additional Steps
If you plan on deploying the WordPress site in the same place where the static HTML website used to be, there a few more things to do before you finish.
The first one is to check the URLs of your newly imported posts and pages to make sure they are search engine friendly (i.e. include the keywords you want to rank for). It’s very simple – just go to a page or post and look at the URL below the title.

To change it, click Edit on the right, change to the URL to your choice, and hit Ok.
A second thing is to implement redirects from the old URLs to the new ones. That way, you won’t lose out on existing SEO value.
If you have filled in the old site address in the HTML plugin, it will create the redirect code for you. You can copy and paste this into the file.htaccess that resides on your server (usually in the root directory).
You access it via FTP, however, you might have to enable seeing hidden files as it isn’t visible by default. Then edit .htaccess and input the rules.
Be aware that it only works if you have left the URLs unchanged. If you haven’t and need to set custom redirects, use the Redirection plugin. It’s a very comfortable solution that also tracks whenever somebody lands on a non-existent URL on your site. That way you can implement redirects for those links as well.
Did You Successfully Move from HTML to WordPress?
And that’s it. You just learned how to convert a static HTML site to WordPress. As a consequence, you have become part of one of the largest communities on the web and gained access to thousands of resources to make your site even better.
Depending on which solution you picked above, you have already gotten an impression of how WordPress works. From here on, it’s quite easy to branch out and dive deeper into creating websites with the WordPress platform. If you need additional help in this area, this site has loads of it. You can learn how to:
- Customize WordPress step by step
- Move your site from HTTP to HTTPS
- Add custom fonts to WordPress
- Speed up your WordPress website
- Add a contact form to your WordPress site
Aside from that, we wish you good luck with your newly minted WordPress website. We hope you enjoy working with WordPress as much as we do.